When Husband had his birthday a few weeks back Sprog and I put together a Han Solo costume for him, so he was sorted, barring some last minute adjustments.
Widget on the other hand, slept through most of that party and didn't have a costume. Since Han Solo's best friend is Chewbacca, we decided to go Wookie for Widget. I bought some faux fur and started looking for patterns. From the fabric store I sent a pic to Husband to pick the right fur colour. This was a matter of great debate and was taken very seriously.
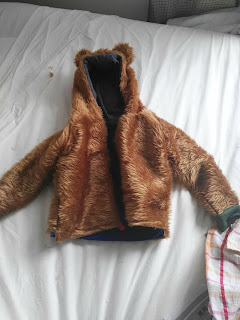
To make the costume last longer, in terms of the kids being able to fit it, I decided to do a two piece costume rather than a onesie version. I used a denim needle to pierce through the faux fur and, on the advice of those more experienced in sewing faux fur than me, used a contrasting thread for seams to make it easy to unpick mistakes. It was a super useful piece of advice too.
Widget has some great pyjama's I made a few months back, so I used the pattern for the bottoms from those to make furry trousers. I had some knit I picked up at the hospice shop a while ago for peanuts, so I put that in for the lining as Widget has had sensitive skin lately and I didn't want to aggravate it. I altered the waistband to have rib knit to make it comfy, then used some tape to thread through the waistband as a tie. Mostly because I didn't have enough elastic to hand and didn't want to buy any.
With that planned out I took to figuring out the top half. I knew I needed it to be a hoody, something I had not yet made, and so didn't have a pattern for. My first port of call pattern shop didn't have quite what I was looking for, but a bit of Googling later I found a free pattern from Brindille and Twig that suited my purposes really well. I decided to put a zipper down the front to make it easier to get a wriggly not-quite-2-year-old in and out of.
I cut the pattern out, using rib knit for the wrist cuffs, and adding about an inch through the middle of the front for the seam allowance next to the zipper. I used a couple of old tops that I was going to get rid of for the lining. The pattern went together really quickly. I made sure to pull the fur away from the seam as best I could before sewing, another tip from the voices of experience. It made a difference to the fluffiness of the seams because the fluff layer wasn't trapped flat.
I made the body of the jacket in fur, with hood, and in lining without hood, then attached them when I put the zipper in. I stuffed this up and ended up with the zipper pull on the inside. I decided to just leave it. For an everyday item I would have changed it, but for dress-ups it wasn't going to be annoying enough when wearing to go through the bother of unpicking.
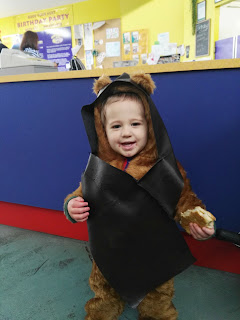
Partway through this process I showed Sprog some youtube clips of Return of the Jedi. He agreed with me that an Ewok would be a better thing for Widget to be than a Wookie, and a quick poll of friends who are Star Wars enthusiasts agreed. This basically meant adding ears to the fur suit, and changing from an ammo sash, to a hood. Given my zipper was bright red and blue, just one I had lying around, turning Ewok and needing a hood was a great way to cover it up.
Before attaching the hood lining I cut two skewed half circles for each ear and sewed them right side together around the top of the ear. After turning them right side out, I cut slits in the fur hood, before poking the raw seams through. I wiggled them around to get them to fold inwards slightly, then tacked the raw edges to the underside of the hood holding them in place. One of the benefits of working with fur is that messy stitching gets covered up with the fluff.
One the ears were on, and the rib knit wrist cuffs were attached I sewed the hood lining to the fur hood, and then attached the hood lining to the lining for the body. I sewed it right sides together from the edge to the shoulder seam on either side, then topstiched the middle bit together.
One Furry suit: done.
There a quite a number of Ewoks in the movie Return of the Jedi, not even counting the ones in the standalone Ewok movie, or the cartoon. When I thought of Ewoks I always think of this guy:
So I planned for a hood that is long in front with ears peeking out the top. Also - this style covered up the blue/red zip. Huzzah!
I started with a square of pleather about half a meter square. I chopped straight through the middle to make two rectangles, then I cut a large corner off one of the rectangles. I stuffed a toy inside the furry jacket to hold it's shape then pieced them together until they made a satisfactory hood. I folded the leftover rectangle in half right sides together and sewed a curve to make it a hood shape, then cut two slits where the ears on the furry jacket were. I pulled the ears through to hold it in place. The rectangle with the corner cut off was attached to this on one side, with the cut off triangle attached to the other side to fill in the gaps. All of these seams I sewed wrong sides together to imitate the rustic-ness of Ewok garments.
One Ewok Hood: Done
Today was party day, and I couldn't find Sprog's pirate vest anywhere, and that is what we used for Han Solo's vest. I had some pleather I had bought for the hood, but not used in favour of using up the pleather I had leftover from making the pirate vest.
I cut using the vest pattern I had in stock, bought for the Paw Patrol vests, then used again for the pirate vest. I cut the back piece short, and cut the bottom of the front piece on an angle from the size 5 in the middle to the size 2, to match the back, on the seam. I sewed the shoulder seams together, then put it on Sprog and checked. I matched the top corners properly for the side seams, then swivelled the piece so that instead of matching the seams down the edge, sewed straight down the back piece but on an angle relative to the edge of the front piece so I ended up about an inch further in from the cut edge.
Hopefully this makes my ramblings more understandable.
I cut a little away at the top to stop the vest banging him in the chin. I also added a snap to hold the top corners together. Han Solo wears his vest open, but I wanted my little Han Solo to not worry about it staying on.
The last bit was a holster for his blaster. My sister who has three kids herself, all older than mine, gave Sprog a blaster with great glee for Christmas. It was the perfect accessory for Han Solo. This was a matter of folding/rolling some pleather and sewing across to fix it at a size suitable for the blaster, then folding over the top to make a belt loop.
The look was completed with decorated jeans. Decorated with a striped of masking tape down each leg on which I had coloured in red stripes.
Then it was off to the party with Han Solo and my little Ewok (and don't forget the R2D2 cake)


No comments:
Post a Comment